• DIY Very Hungry Caterpillar Name Cards 🐛

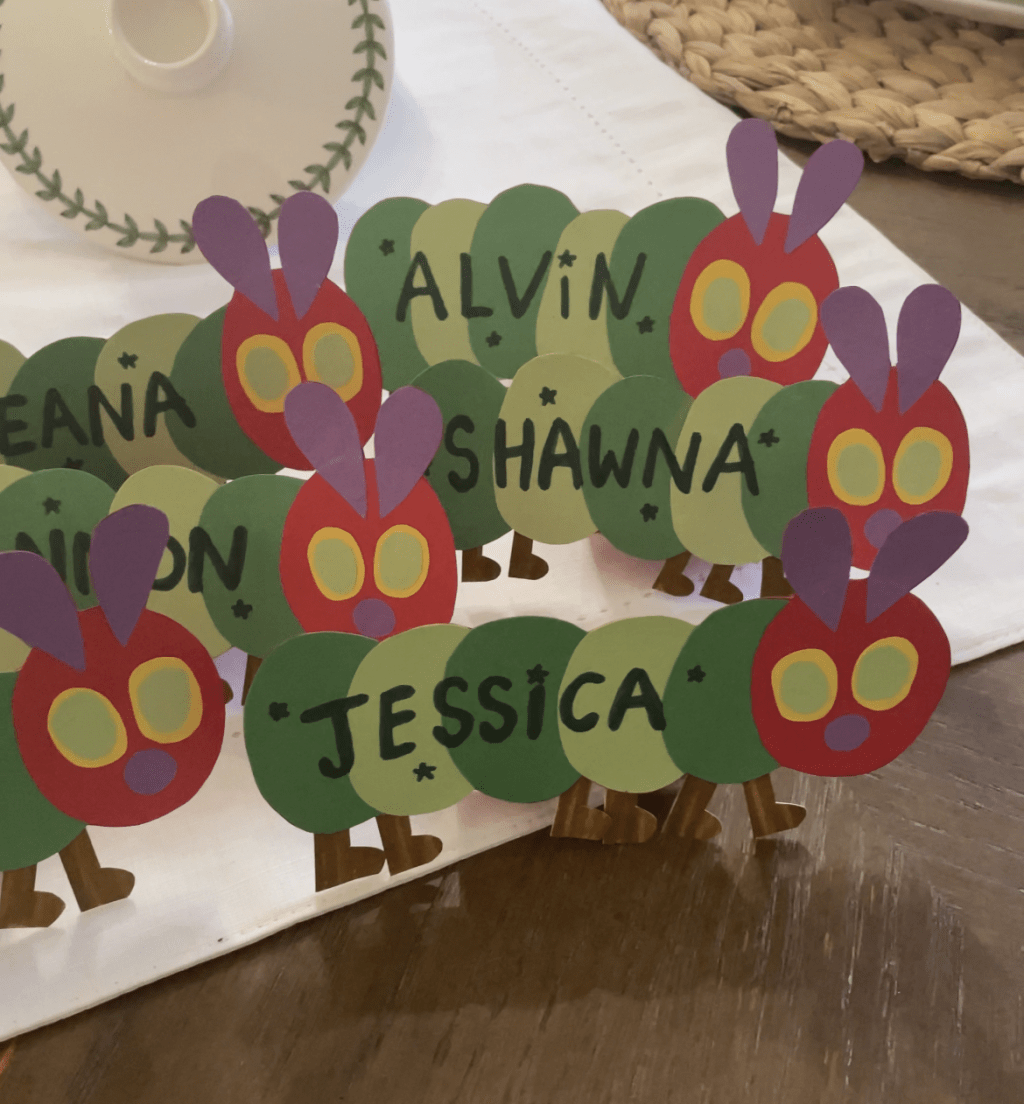
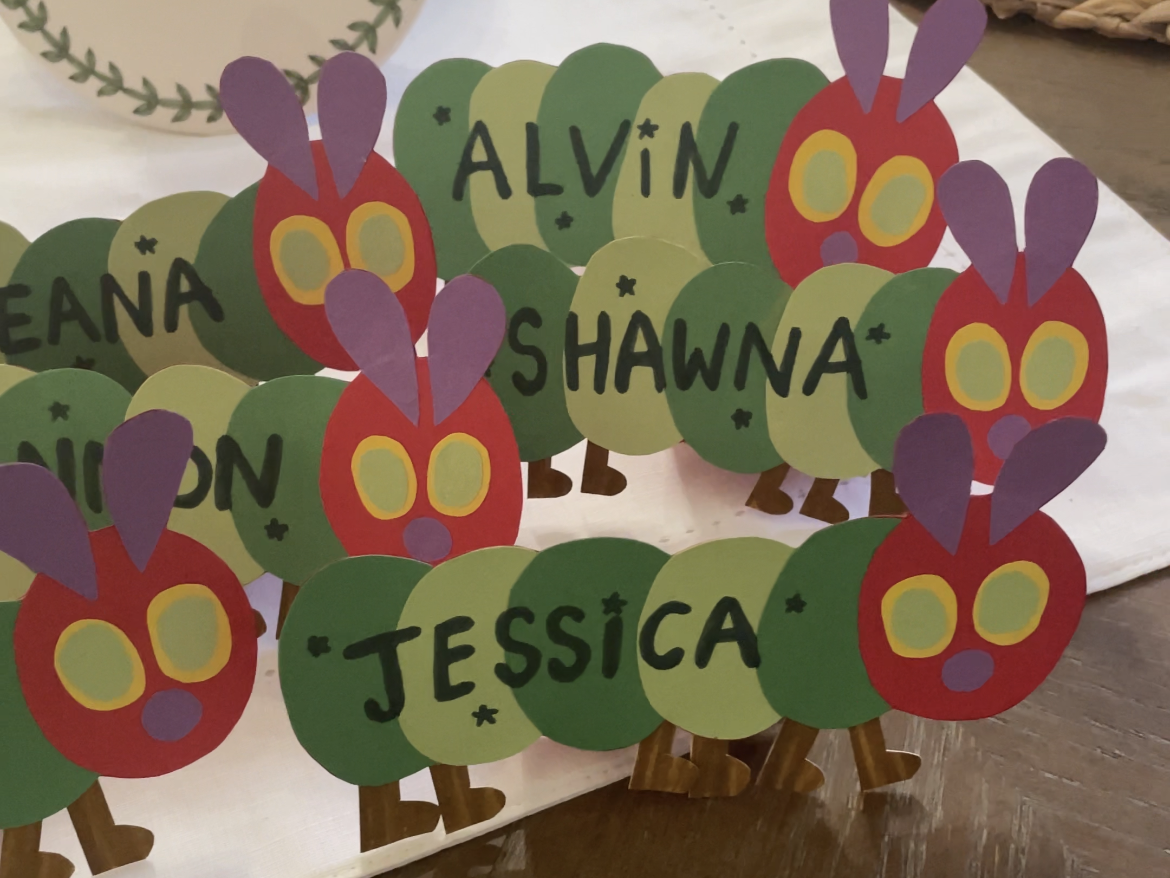
    I always like to make every guest feel extra welcome with a name card. And for my insect-themed party, I knew that I wanted to incorporate the very hungry caterpillar somehow!

    These were super simple & straightforward to make so let’s get started:

    What you’ll need:

    • Paper: red, light green, dark green, purple, yellow
    • Marker
    • Scissors
    • Glue stick

    Step 1: Cutting out the shapes

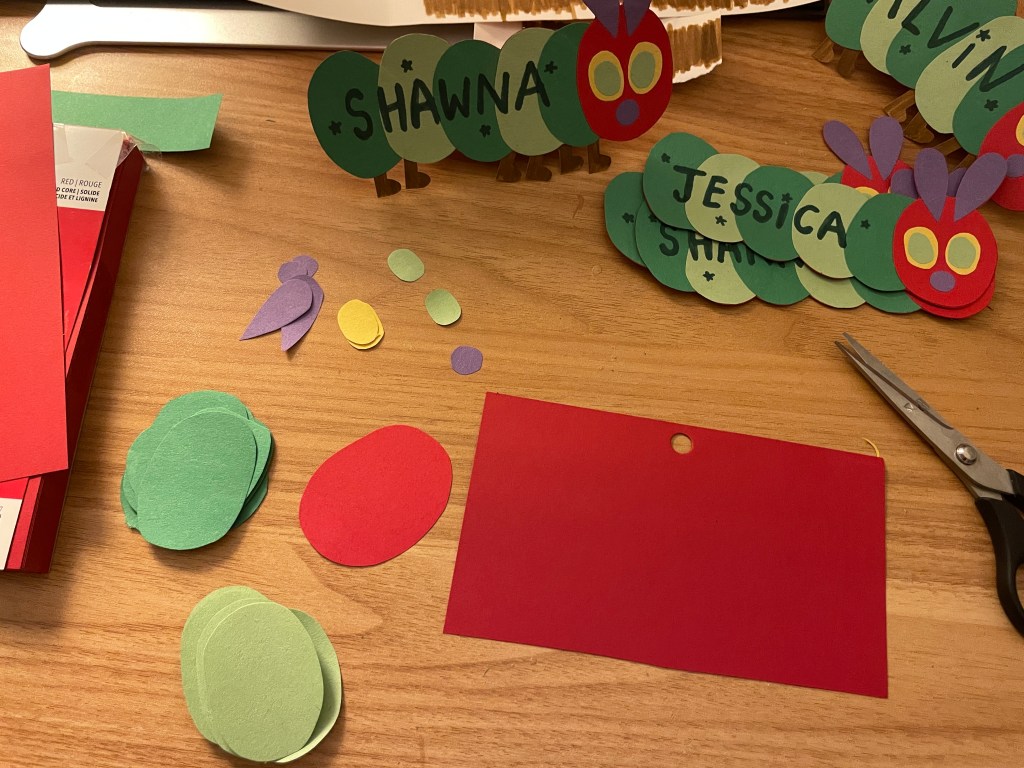
    I didn’t use any sort of template for this and just cut out each detail by looking at a photo of the very hungry caterpillar. You’ll just need to cut out a general oval shape for the body, face, eyes & nose.

    Step 2: Gluing everything together

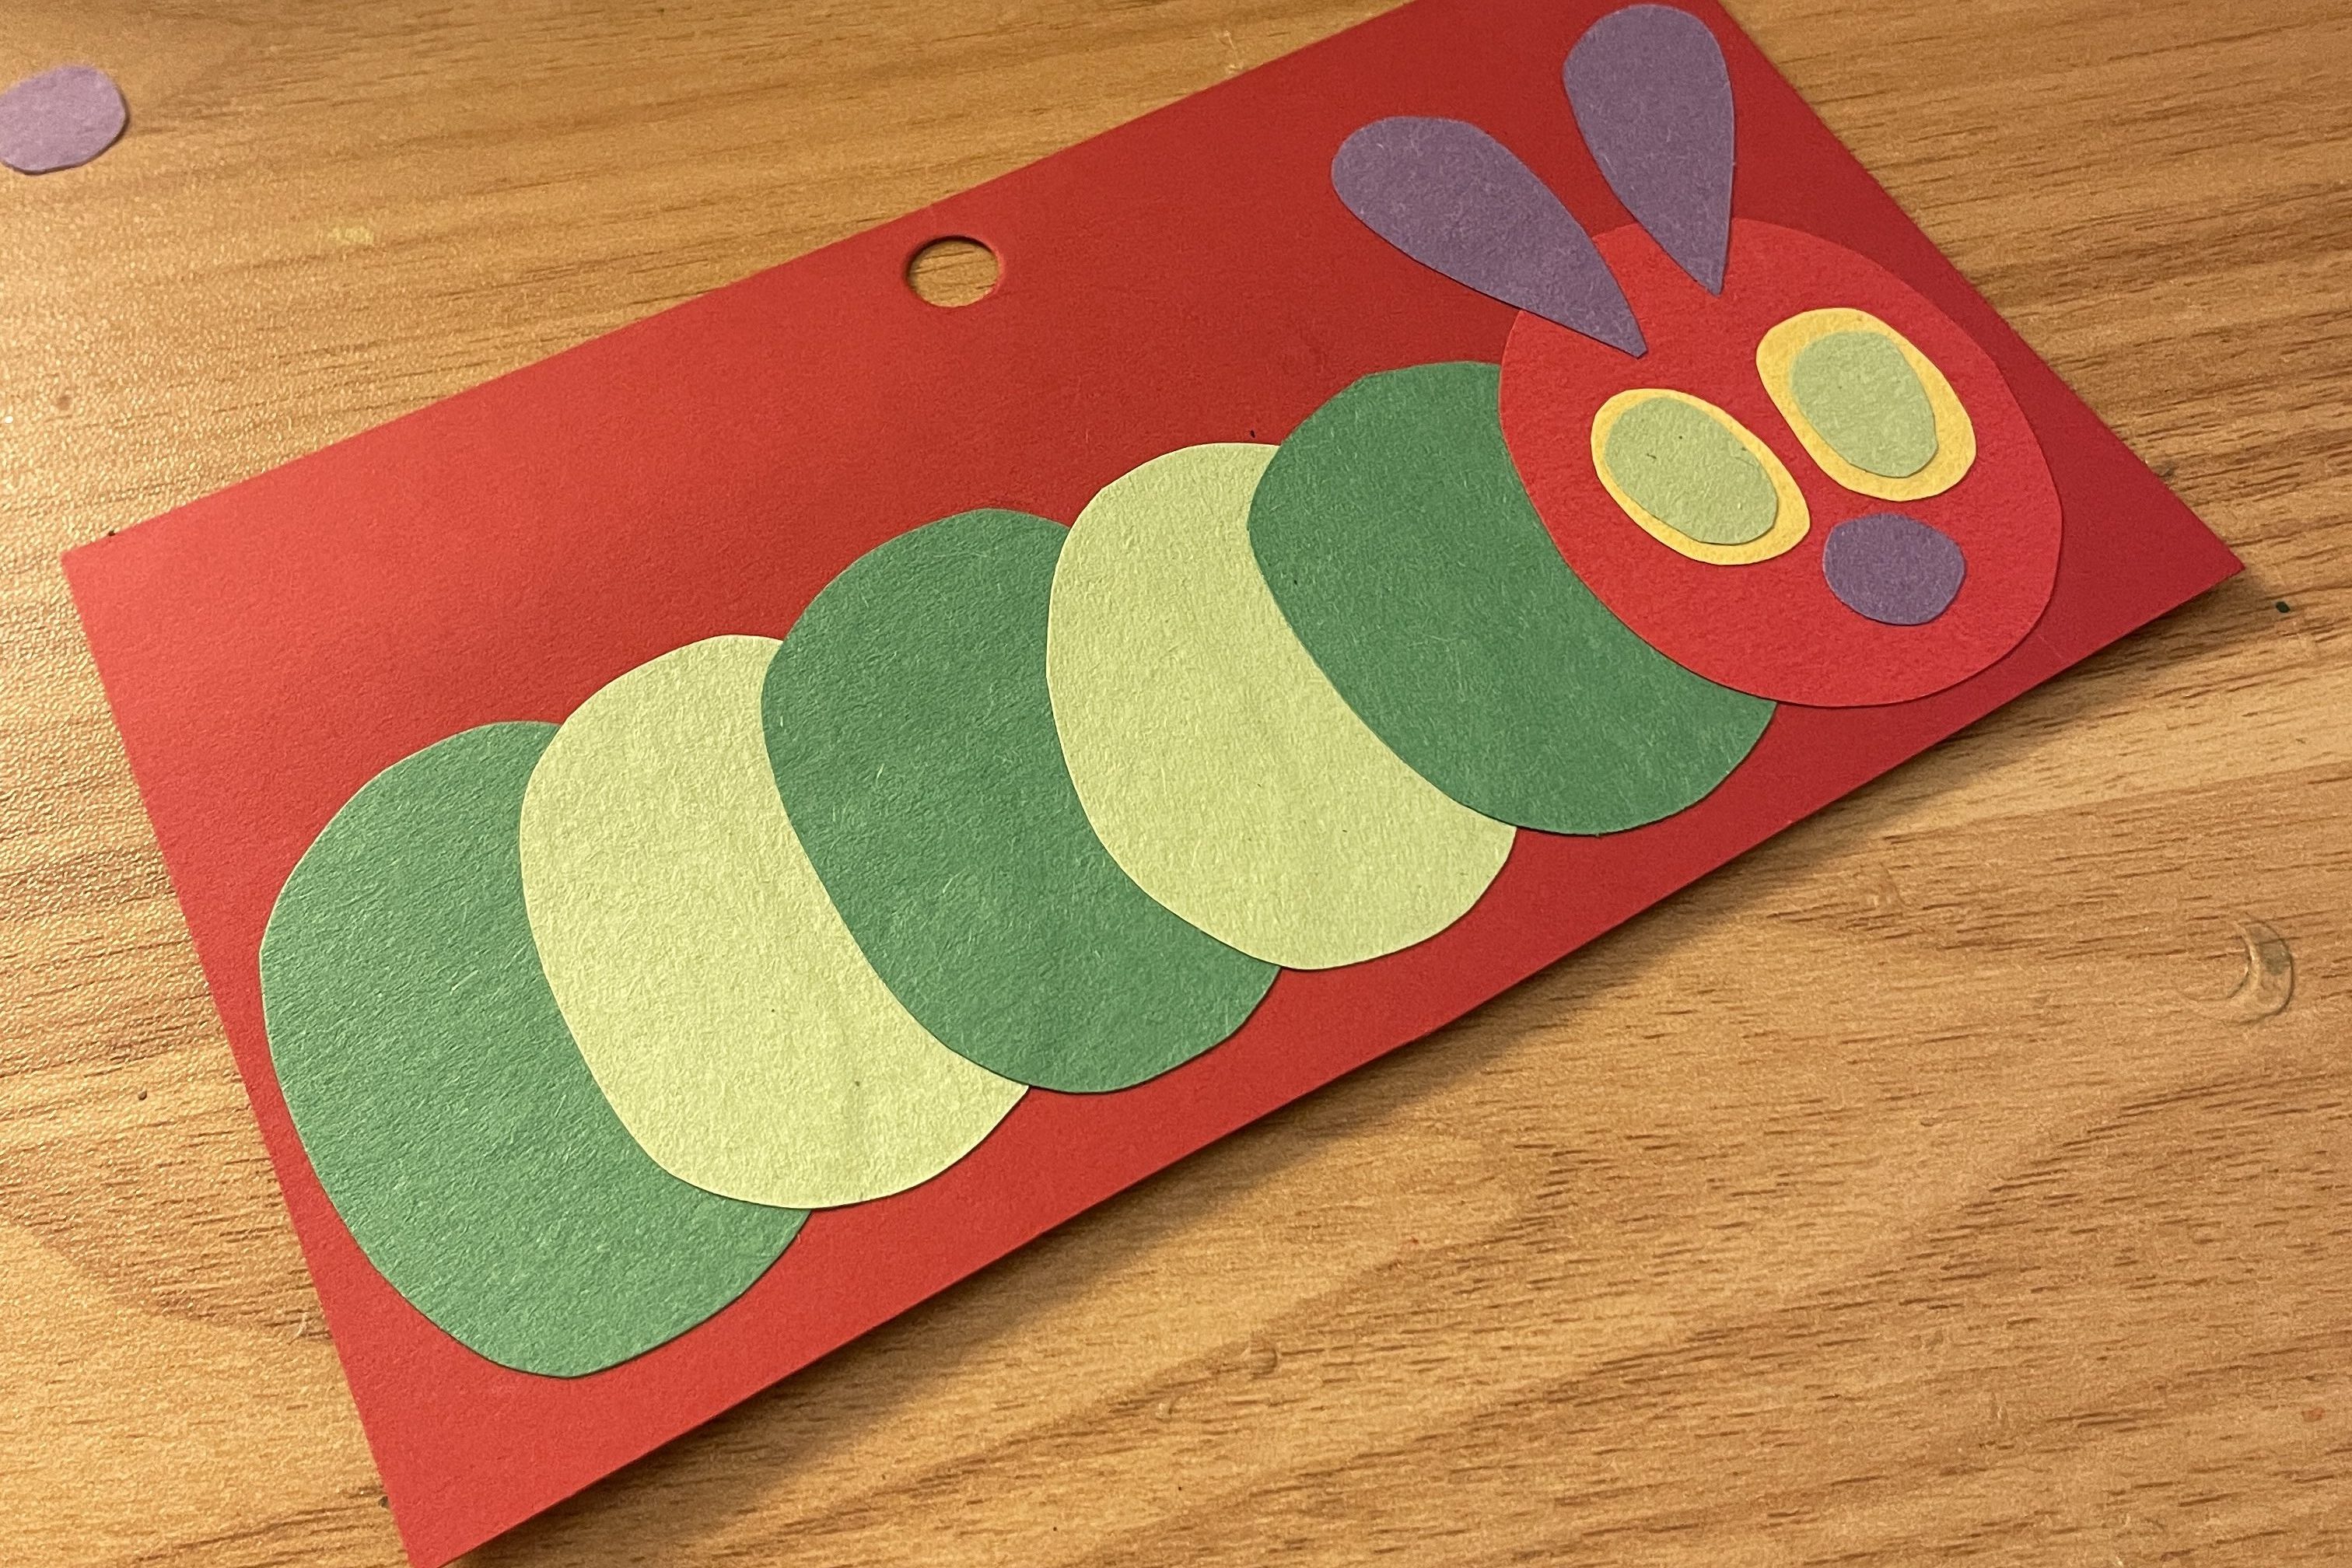
    I glued everything together on a piece of cardstock paper to give it a sturdy foundation.

    Step 3: Attaching the legs

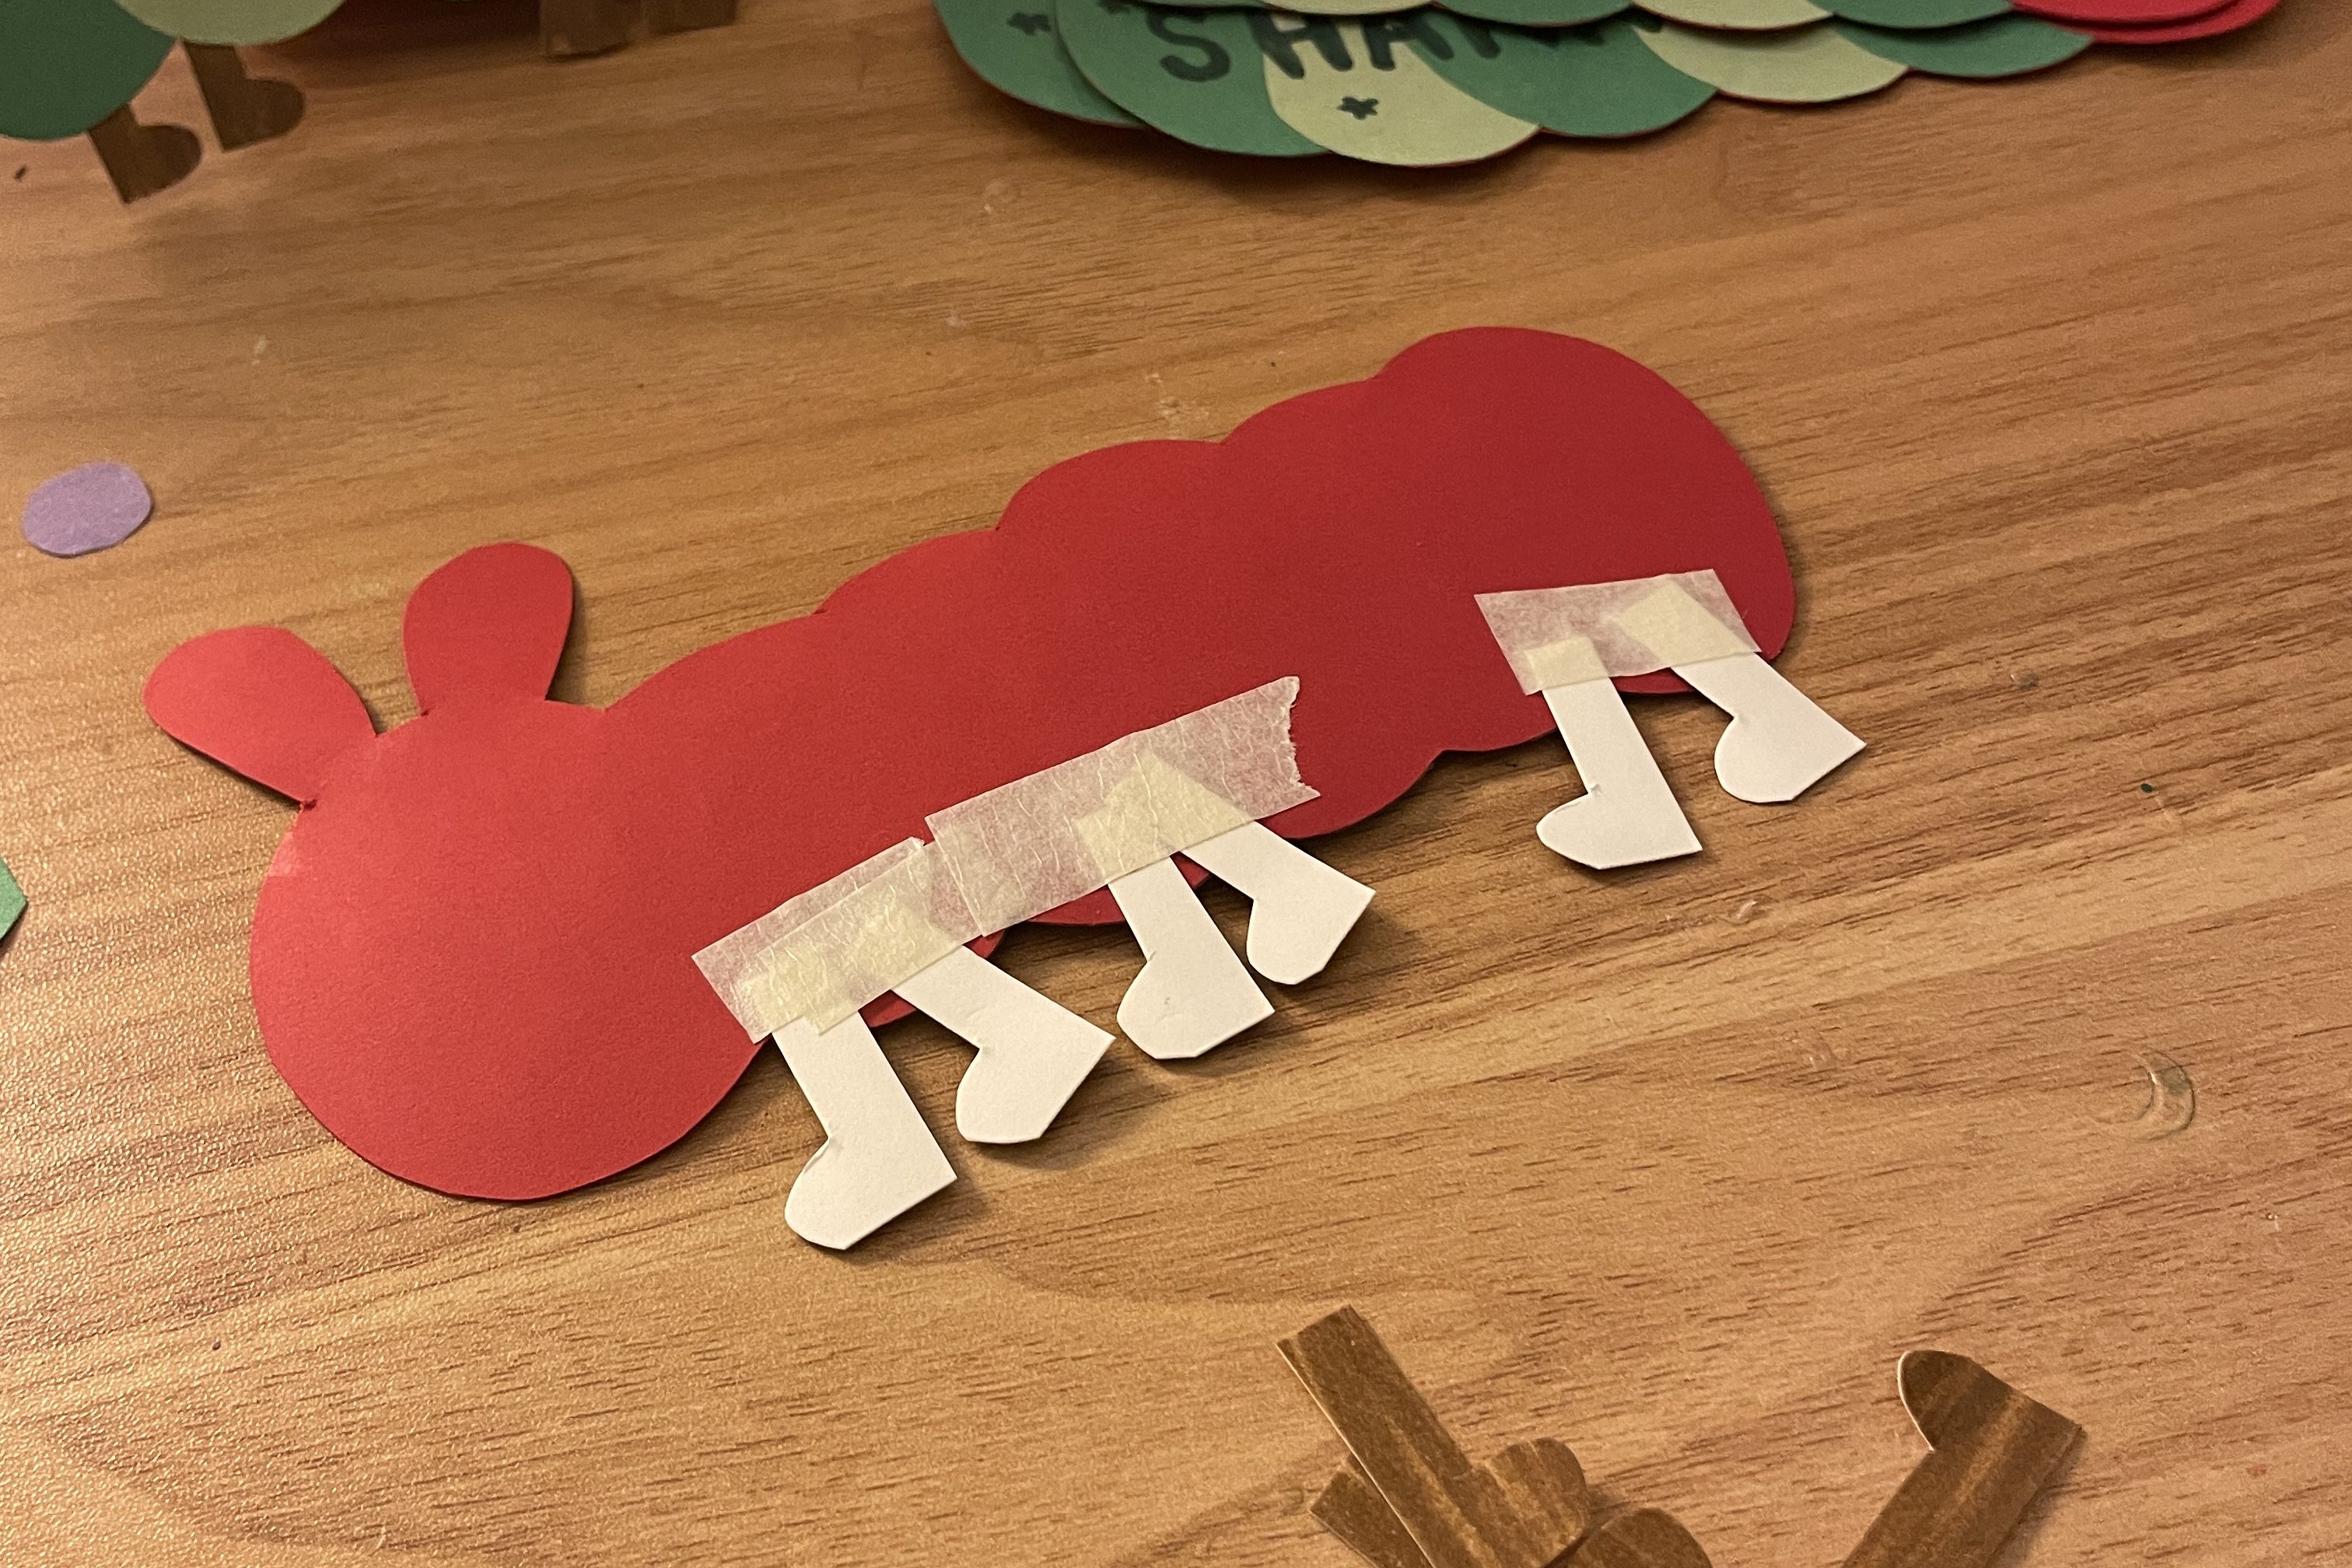
    I attached the legs after I cut out the caterpillar because it makes the process much easier. You can use glue but I ended up using tape to secure the legs.

    Step 4: Adding the stand

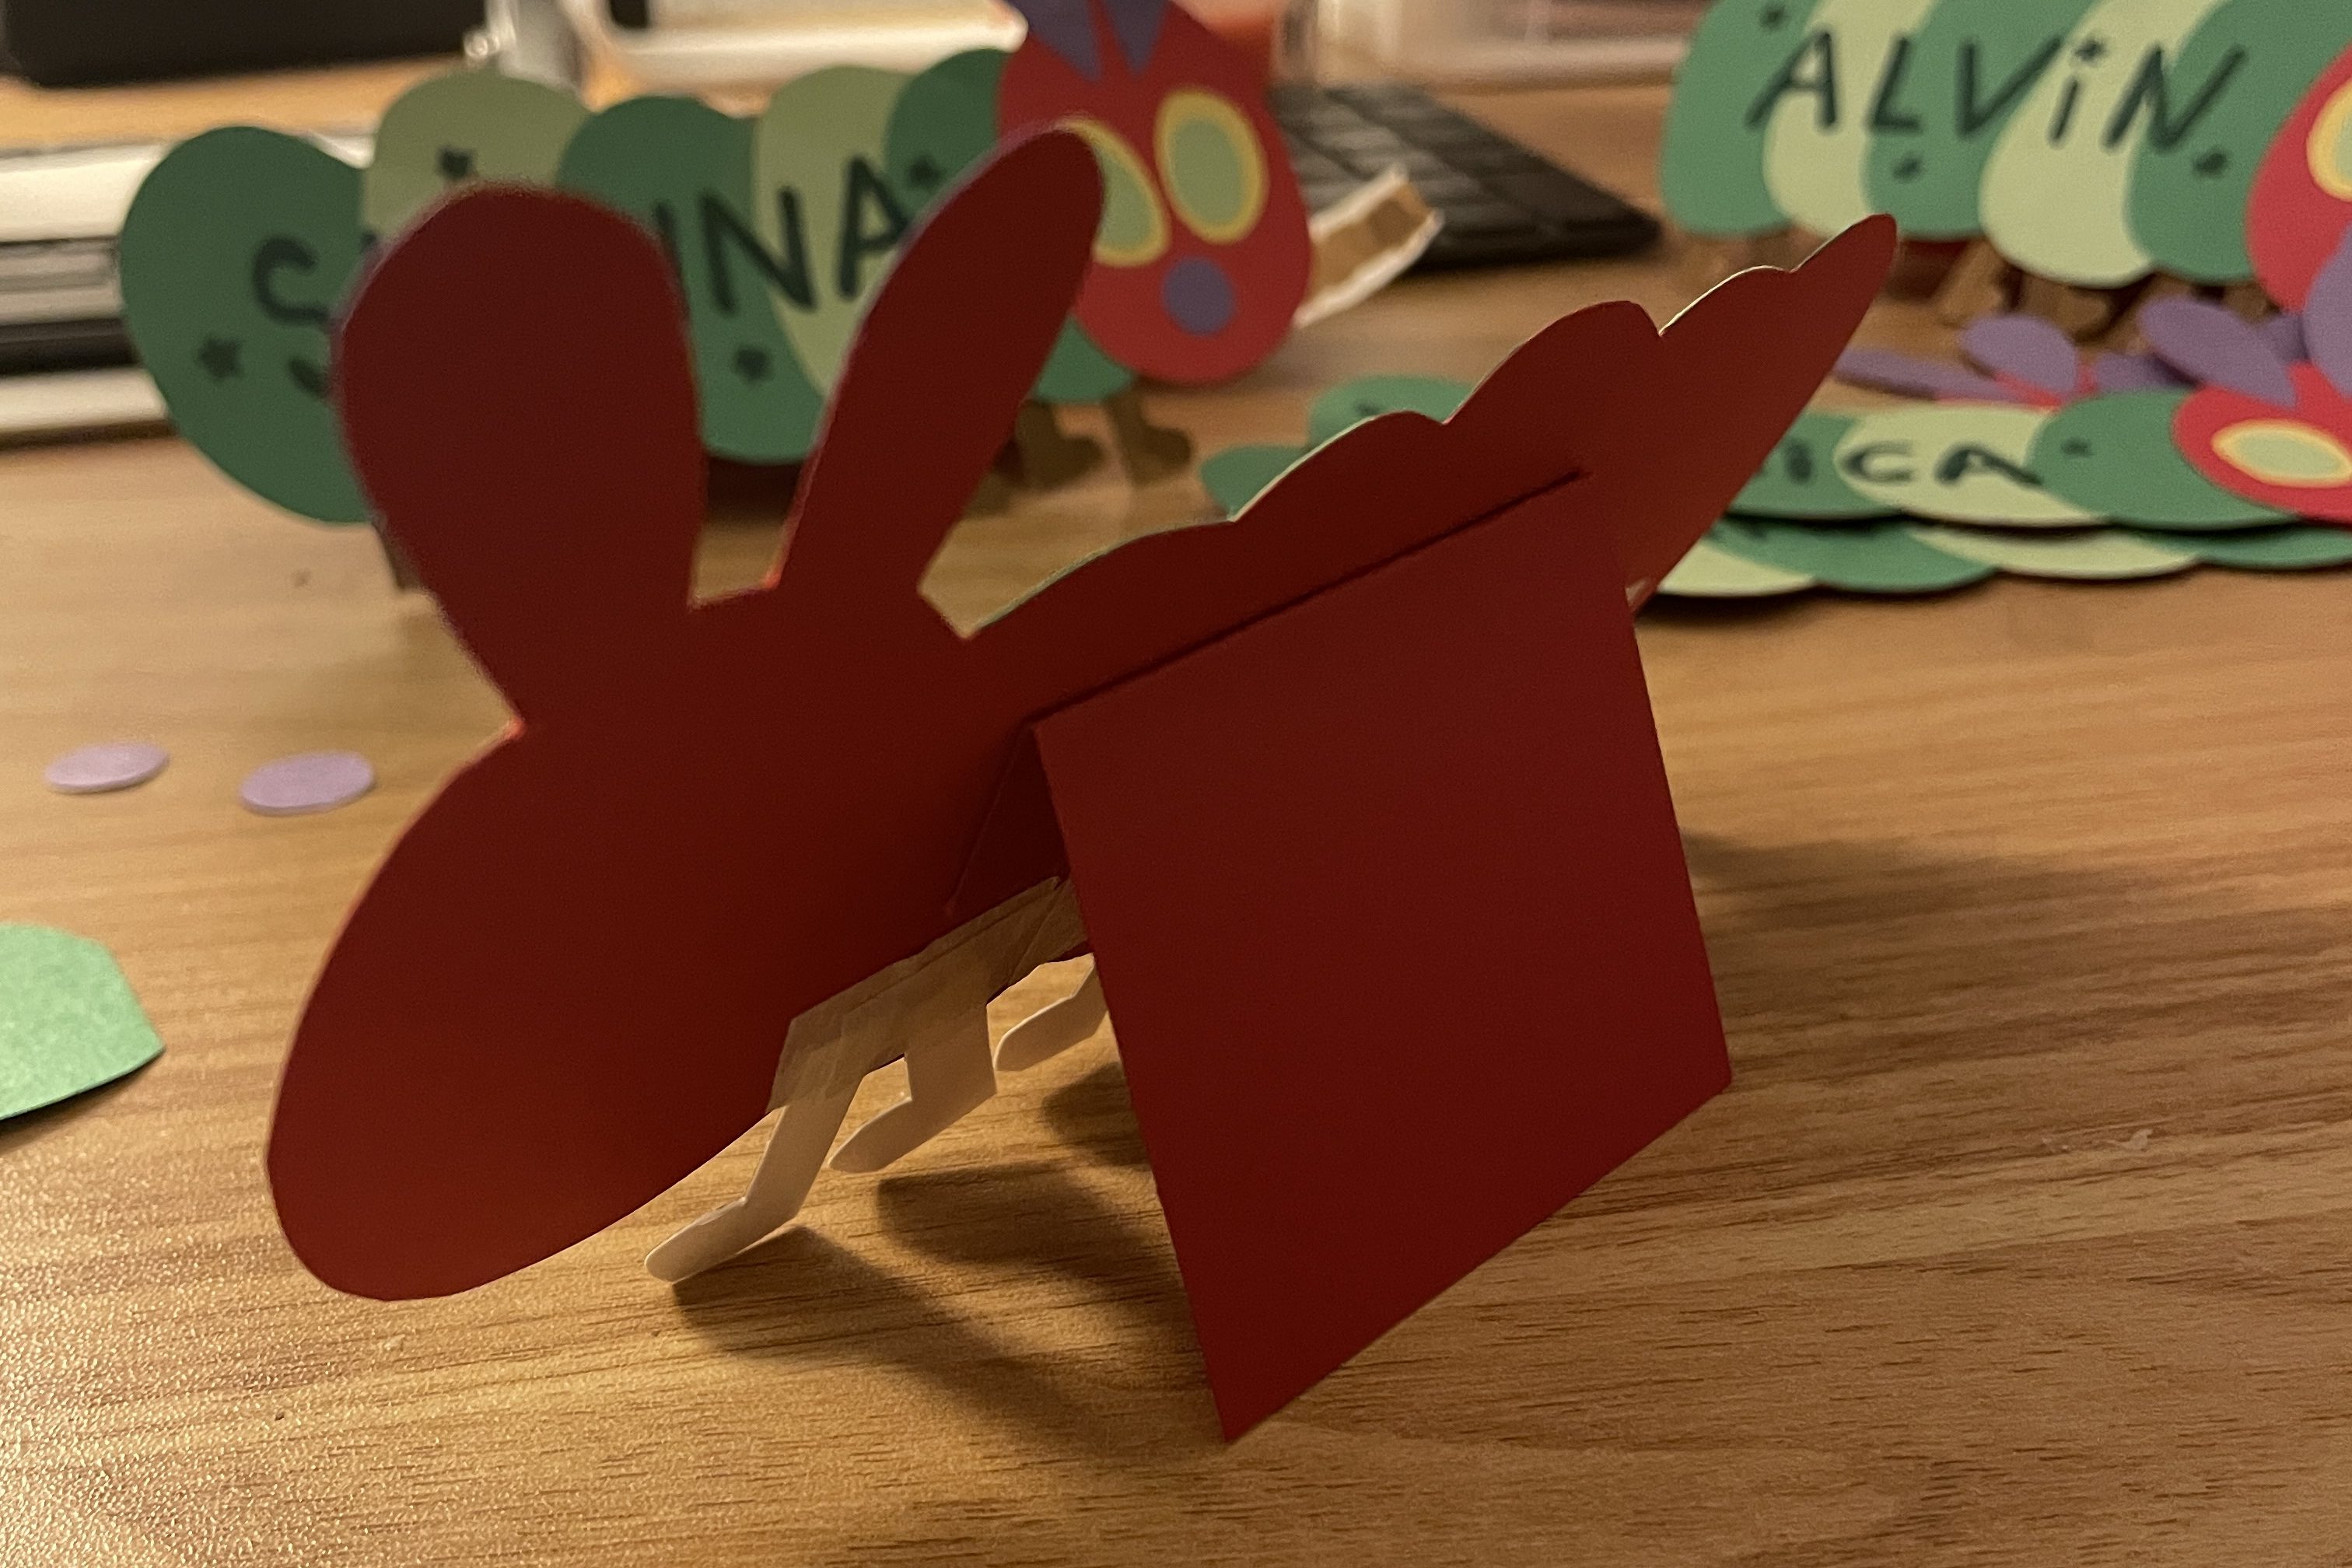
    To make the name card stand on its own, I cut out a rectangular piece of cardstock paper and folded the edge, gluing that to the back of the caterpillar.

    Step 5: Writing the names

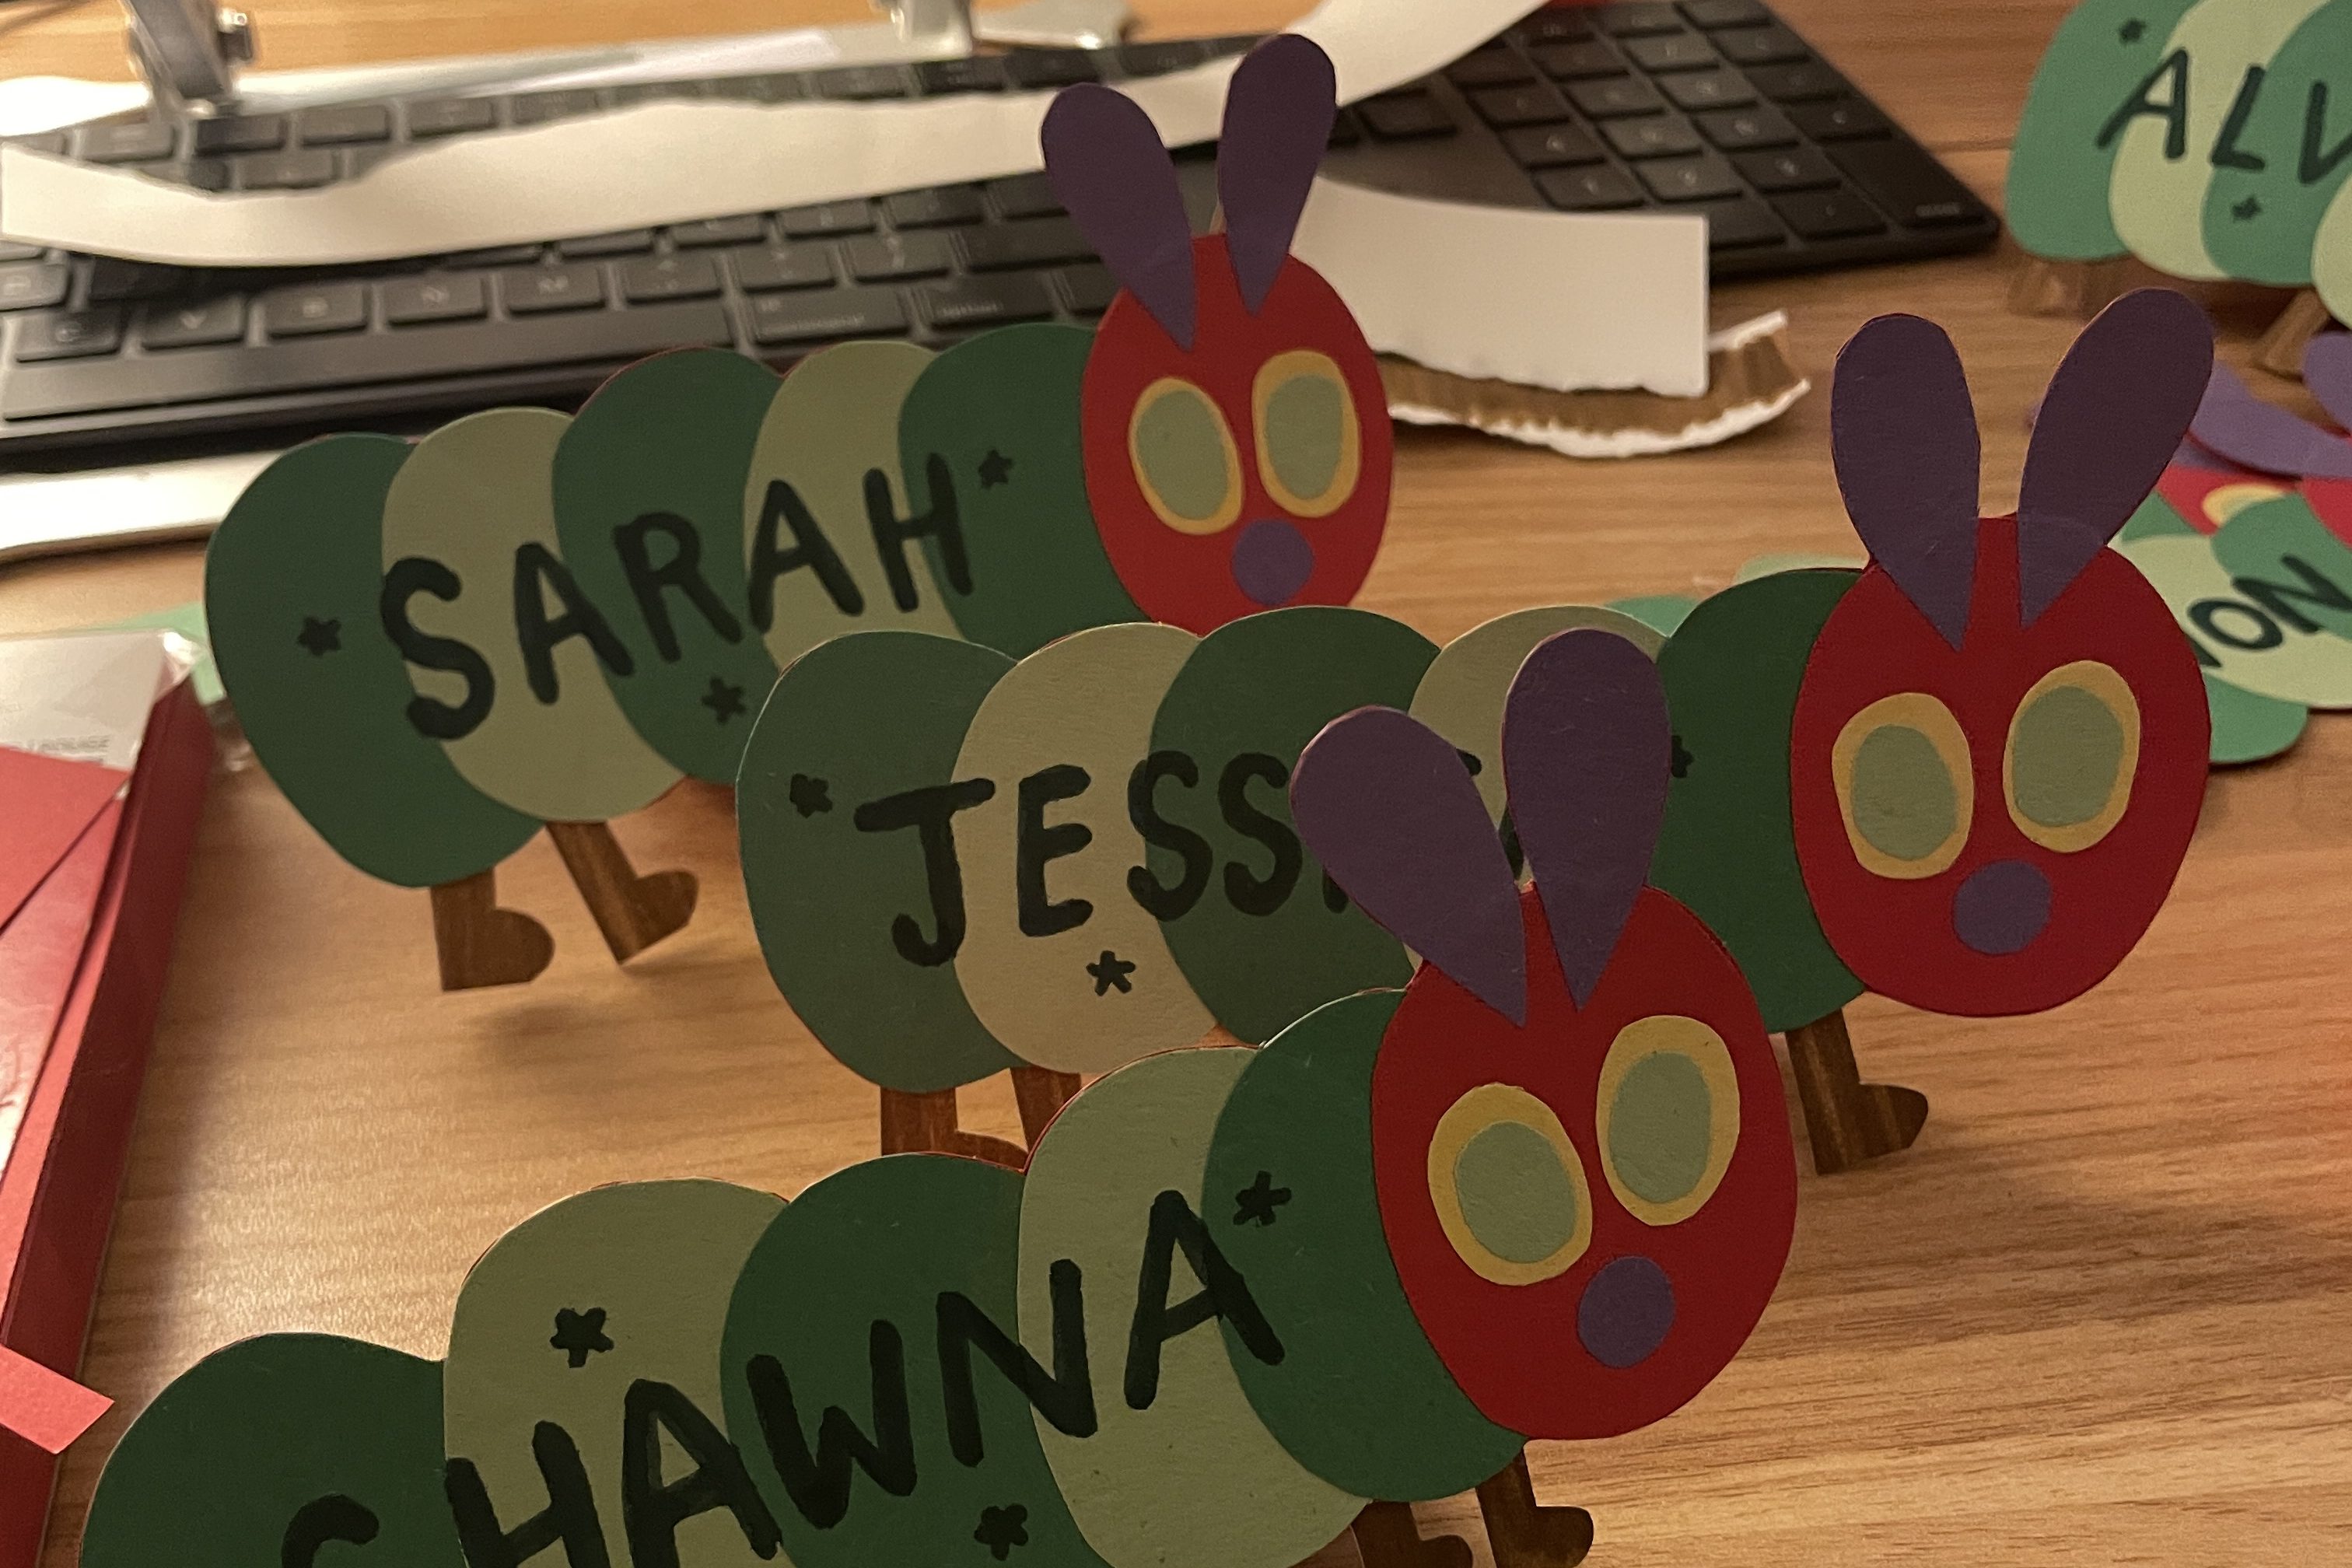
    Write your guests’ names with marker and you’re all done! Now you have these cute very hungry caterpillars waiting to welcome each guest 🐛

  • Insect Party Ideas: Decorations, Food, and Activities 🐞

    Subscribe to continue reading

    Subscribe to get access to the rest of this post and other subscriber-only content.

  • Tomato Lover’s Guide to Party Decor

    Calling all my tomato lovers! 🍅🍅🍅 Whether it’s you or your loved one, a tomato-themed party is the cutest way to celebrate!! Here are some tomato-themed decoration ideas for your next party:

    DIY TOMATO BALLOONS

    diy tomato balloons, tomato party decorations

    What you’ll need: red balloons, green pipe cleaners, green paper

    How to make it: First, you’ll obviously need to blow the balloons. Next, you’ll want to cut the sepal of a tomato with green paper. I kind of cut it into the shape of a thin & spiky star. Make sure to cut a slit in the middle where you can slip the balloon through. Finally, wrap green pipe cleaners around the balloon’s knot and coil it with a pen.

    DIY TOMATO PLATES

    diy tomato paper plates, tomato party, tomato decorations

    What you’ll need: red & green paper plates, glue stick, scissors

    How to make it: Cut out the tomato’s sepal from the edge of a green paper plate. Glue it to the red tomato plate and that’s it!

    DIY TOMATO CAKE TOPPERS

    diy tomato cake toppers, tomato party, tomato decorations

    What you’ll need: red & green felt, toothpicks, hot glue

    How to make it: Cut out two circles from red felt and a tomato’s sepal from green felt. Hot glue on the sepal to one red circle. Finally, hot glue the toothpick in between the two red circles, creating your felt tomato cake topper!

    DIY FELT BIRTHDAY GARLAND

    diy birthday garland, felt garland, diy birthday decorations, felt decorations

    What you’ll need: paper, printer, felt, ribbon, yarn, scissors, hot glue

    How to make it: Print out photos of the birthday person and cut out the outline of their head. I glued them to a cardstock paper to make them sturdier. Next, I created different birthday garlands with felt and got as creative as I could with these. You can go with a classic polka dot look, add a cake or a ribbon, etc. Hot glue everything together. Finally, create the garland by hot gluing ribbon across each birthday hat.

    Alternative idea: you can totally make the birthday hats out of paper too! I actually think you might be able to get more creative using paper due to the nature of its material.

    If you have any tomato-themed party ideas, I’d love to hear them! I truly think there are so many ways you can get creative with this theme 🍅 My boyfriend is the tomato-lover in my life and I felt so happy to be able to surprise him with this. We had such a lovely time and I was able to remind him that I love him from my head tomatoes!

  • Ultimate Guide to a Squid Game Themed Movie Night

    Any Squid Games fans here? 👋 When this show first came out, I watched the first episode and was immediately hooked that I binged watched the entire show within two days. The concept of the show was so intriguing and thrilling that I found it so entertaining to watch…and evidently the rest of the world thought so too LOL

    So when the 2nd season came out, I thought it would be so fun to begin watching with my friends; hence a Squid Game themed movie night was born! Here’s a look into all the things I prepared for this exciting premiere and a great idea for your next fun activity idea with family and friends:

    DIY MOVIE TICKETS

    I always like to make each guest feel extra welcome by creating a keepsake with their name on it. And what’s more fitting than a movie ticket! These were very simple & straightforward to make – only using cardstock paper and markers.

    DIY MOVIE SIGN

    Another fun detail for a movie night is a movie sign! Clearly you don’t have to be an artist for this one 😅 but it really sets the mood right when your guests enter so it’s a nice detail to have. I first cut cardboard into the shape of the sign and painted the cover image of the squid games season 2 premiere. I added the major elements of a movie theater sign like the ‘now playing’, date, theater name, movie image and the side lights (stars).

    DIY THEMED POPCORN BOXES

    Nothing beats the smell of popcorn right when you enter the movie theater 🍿 I thought it would be such a cute idea to replicate the players’ jerseys into these popcorn boxes. So simple to make and all you really need are popcorn boxes (I bought from the dollar store) and cardstock paper. I studied the details of the jerseys and cut them out with cardstock paper. And simply glued them on the popcorn box.

    LIFE-SIZE SQUID GAME GIRL DISPLAY

    Now this is when I had a grand idea – create a giant display of the squid games girl. I had a bunch of cardboard and I knew I had to seize the opportunity. I went into this project not really having a laid out plan but knew that the bottom had to be stable enough to hold the weight of the entire display. So I layered up lots of cardboard for the shoes and kept stacking on cardboard from the bottom up. It took a lot of cutting cardboard and using hot glue to create the display. Once I painted over the entire thing, it really brought everything together! It was definitely a show stopper and made for a great photo prop.

    DALGONA ACTIVITY

    If you’ve watched season 1, you know the infamous dalgona game. I always try to incorporate some kind of activity into each of my events and knew the dalgona game would be perfect. It was such a fun activity especially for those who has never tried it.

    I will say though that creating the actual dalgona with the shapes was a CHALLENGE. It took me almost three hours just to create eight perfect dalgona pieces. But it was well worth it because it made for such a fun activity. I made sure that there were different shapes like a snowman, candy cane & bell and hid them under these paper containers. I provided sewing needles which everyone ended up utilizing. And then to make things a bit spicier, I used a nerf gun to “shoot” anyone who failed the challenge.

    HONORARY MENTION *FAILED

    Welcome to my museum of failures – the paper stanchions that you see at any premiere or fancy events. In theory, it would’ve made for a very cute and festive entrance but in execution, it didn’t turn out to be a good idea. I made the red ropes from linking red paper chains and the gold poles from balloon holders. However, the balloon holders turned out to be too flimsy to withstand the weight of the red paper chains. Another issue was that I tried setting these up the day of the event so I didn’t have any time to make these again. I was very frustrated and disappointed in myself that these didn’t work out because I knew they would’ve been so cute. But we learn and we move on! Plus, now I know better for my next movie night 🎥

  • MARCH: tomatoes, insects & tangerines oh my!
    • tomato-themed party, party ideas, tomato, birthday, birthday party

    Page 1: I surprised my tomato-loving boyfriend with a tomato-themed birthday party. I wanted to showcase a closer look into how I created each decoration 🍅

    Page 2: I hosted an insect-themed tea party and to be on theme, I dressed up as a ladybug! A playful way to show how to dress up as one if someone is also interested. Li

    Page 3: I like to spotlight my favorite show/movie of the month and mine happened to be the kdrama, When Life Gives You Tangerines. I actually started watching a little late into the month because I needed to emotionally prepare myself before watching. But the acting, storyline, dialogue – 10/10 definitely recommend.

    Page 4: Had to recreate the starter pack meme just so people can send a subtle message to their friends 👀

    Page 5: Another consistent series I’ve been sharing on my instagram, my favorite songs! Music is a huge part of my life so I like to share the songs I listened to the most of each month in the case that other people might be able to relate or find new song recommendations.

    Page 6: YouTube is also another huge part of my life and how I consume the majority of my entertainment so I like to share my favorite youtube video of the month as a way to connect with other likeminded people!

    It’s my goal to continue posting this monthly journals (or digital zines as one might say) for the rest of 2025! 📝⭐ If you’d like to stay updated in real time, follow me on IG: March Journal | Instagram @monhrle

  • DIY Princess Cone

    Peak girlhood is making princess cones together ⋆౨ৎ˚⟡˖ ࣪ If you’re hosting a princess cone making party, I’ve got just the tutorial you need!

    What you’ll need:

    • Poster paper
    • Pencil & string
    • Fabric (I bought mine at my local thrift store)
    • Hot glue gun
    • Tulle
    • Decorative materials: ribbon, pompoms, felt, etc.

    Step 1: Creating the cone base

    First, tie a piece of string to a pencil. Next, from one corner of the poster paper, hold down the string and with your other hand, guide the pencil to create a curved line starting from the next corner of the paper. You should get the shape as shown in the middle photo.

    Step 2: Attaching the fabric

    Cut your fabric in the same shape as your cone base but make sure to leave at least an extra inch all around. Proceed to hot glue the fabric down onto the paper. Then roll up the paper to create the cone shape and secure it by hot gluing the edge.

    Step 3: Decorating

    This part is up to your creative design but play around with ribbons, pom poms, felt, etc. and secure everything with hot glue. Here are some of my friend’s cones to help you with design ideas ⋆౨ৎ˚⟡˖ ࣪

    Step 4: Adding the cone train

    A close-up of hands working with tulle and a decorated pink cone, showcasing a crafting process.

    Cut two strips of tulle to your desired length and hot glue them inside the tip of the cone.

    Step 5: Adding the straps

    In order to secure the cone to your head, you’ll want to hot glue two strips of ribbon to opposite sides of the cone’s bottom. Remember to take into account the length of your head and being able to tie a bow.

    And now you’re officially a medieval princess – happy crafting! ⊹₊♚₊⊹

    ☆ If you want a video tutorial of all this, check this out:

  • DIY Mini Scrolls

    If you’re looking for an activity idea for your medieval/princess party, these mini scrolls make for a fun & creative activity!

    What you’ll need:

    • Paper
    • Instant coffee & water
    • Paintbrushes
    • Paper straws
    • 3/4″ round wood beads
    • Gold paint (or gold spray paint to save time)
    • Red string

    Step 1: Creating the scroll paper

    Depending on how big you want your scrolls, you’ll need to start off with a sheet of printing paper. Mine were 8.5″ x 5.5″ – half the size of one piece of paper. Rip a small strip off of both sides of the paper as shown in the photo.

    Mixing instant coffee with water, you’ll want to dip your paintbrush into the mixture and stain your paper. Be gentle as to not rip the paper – I’d recommend just dabbing the paper with the brush. And hang them up to dry.

    Step 2: Creating the scroll handles

    Insert your paper straws into the holes of the wood beads. And paint them with gold paint. I’d recommend spray painting to save time if you have the extra bucks. You only really need to paint the edges of the straws because the middle will be rolled in paper.

    Step 3: Forming the scroll

    Once both the straw and scrolls are dried, place a thin layer of hot glue in the middle of the straw and roll the end of the scroll around the straw. Tie the scrolls with red string, creating a cute little bow ౨ৎ

    Now you can use these scrolls for your next party! If you want to know how I used them for my princess craft party, check it out here: Hosting A Princess Craft Party

  • How to Host a Magical Princess Cone-Making Party

    It only took me seeing one TikTok of someone making her own princess cone for me to decide to host an entire princess cone-making craft party and it turned out to be so fun!! Here’s a rundown of everything we did during the party and the preparations that went into making this whimsical day happen ⋆✴︎˚。⋆

    THE ITINERARY

    On theme, I created a huge scroll to display the itinerary of the event. Other than for decoration purposes, the display allows my guests to know what to expect and to manage the time in between each activity. If you’re curious to how I created this huge scroll, here’s the tutorial: DIY Giant Scroll

    TIME OF DESIGN

    Before my guests arrived, I laid out brown kraft paper roll on the entire table and drew a princess where each person would sit. This acted as a space for each person to draw out their potential cone design. I also asked my guests if they could bring any crafting supplies they have such as ribbons, fabric, scissors, hot glue, etc. By looking at all the supplies spread out on the table, they could choose the colors and details they wanted for their cone design.

    This part of the event took more time than I had expected so I would definitely recommend giving your guests a time frame. This can also prevent a few people waiting for a long period of time for other people to finish making their cones. Learn how to make your own princess cone here: DIY Princess Cone

    FASHIONING OF PRINCESS CAPS & CAPTURE OF VISAGES

    It’s photo time! 📸 For each of my events, I like to take a polaroid photo of each guest as a keepsake for them to look back on (although I have been making it a tradition to keep it, make a polaroid cover for it, and then mail it out as snail mail!).

    INSCRIBING SCROLLS & PRESENT SCROLLS IN THE HOUR OF TEA

    As a nice way to unwind, I thought it would be a cute & fun idea for everyone to write on these mini scrolls to truly feel like royalty ♔ This was more of a creative free-writing activity but I gave them some prompts for some brainstorming ideas. We also enjoyed some drinks and snacks during this time.

    I will say that by this part of the activity, my guests had expended so much energy on making their princess cones that their minds came to a blank on what to write so having prepared scroll topics helped. Also, the scrolls were now a keepsake of this event. If you want to learn how to make these mini scrolls, here’s the tutorial: DIY Mini Scrolls

    REFLECTIONS

    Although it was hectic on my end to host and make sure that everyone was having a good time, my friends told me that they had such a wonderful time which made this entire thing worth it for me ⋆˚✿˖° ︎Due to the silly nature of the event, I was a little surprised at how serious my friends were in designing & making their cones. And as evident in the video, each of them did a wonderful & whimsical job in creating a cone that was unique to them ୨ৎ

  • DIY Cardboard Crowns

    I always love a good themed party so when I hosted my princess craft party, I knew that I wanted to DIY decorations related to a crown which is how I ended up with these hanging cardboard crowns. If I can reuse & recycle materials while also saving money, it’s a double win for me & the environment! 🌎

    Here’s what you’ll need:

    • Cardboard
    • Gold paint (or spray paint to be time efficient)
    • Paint brushes
    • Clear string
    • Hot glue gun
    • Scissors

    Step 1: Paint rectangular strips of cardboard with gold paint. Once dried, draw out the outline of various crown shapes and stars.

    Step 2: Cut out your crowns & stars. Due to the rigidity of cardboard, it might be a little tricky to cut out smooth corners. Make sure to keep the scraps of cardboard to use to decorate the crowns later on. Bend the crowns to create the shape of a crown and hot glue the edges together to bind the shape.

    Step 3: Using the leftover scraps of cardboard, decorate your crowns by adding stars, hearts, jewels, etc.

    Step 4: Depending on the length you want your crowns to fall from your ceiling, cut out two pieces of the clear string. I cut mine about 30-40 inches in length. Hot glue the ends of each string to opposite sides of the crown. Gather the two strings in the middle and hot glue two stars on top of each other with the string passing through.

    And there you have it — your own whimsical crown garlands that can elevate the look of your princess/medieval/birthday party!

  • DIY Giant Scroll

    When it comes to decorations, having a statement piece really makes a difference! And if you’re hosting a medieval-themed party, a giant scroll is right on theme 📜✨

    What you’ll need:

    • Brown kraft paper roll
    • Black paint & paintbrush
    • Hot glue gun
    • Yard balloon sticks
    • Smooth foam balls
    • Gold paint (recommend spray paint to be time efficient)
    • (optional) Projector

    Step 1: Creating the scroll handles

    Paint the balloon sticks and foam balls with gold paint (I’d highly recommend spray painting instead to save time if you have the extra bucks). Once dried, shove each end of the stick into a foam ball, creating a hole. You can secure the balls onto the stick with hot glue.

    Step 2: Painting the scroll

    If you have a projector, it makes tracing much easier. However, it is not necessarily needed. I found a specific medieval font that I wanted on dafont.com and typed out the itinerary on a word document. I spread out brown kraft paper to my desired length [remember to save at least 10 inches from the top & bottom to roll around the handles].

    I first traced the outline with a black sharpie and then filled in each letter with black paint. I tried filling in each letter with marker but it didn’t give the dark effect that I wanted so I found that black paint was the best option.

    Step 3: Creating the scroll

    Holding the gold handles to the edge of the scroll, start rolling it up and then hot glue the paper to secure the shape.

    And there you have it! Happy scrolling ⋆˙⟡